Getting Started
General Info
Language Support
Example Applications
User Dashboard
Analytics
Features
API
WordPress
Using MemCachier with the W3 Total Cache WordPress plugin
W3 Total Cache tutorials:
The W3 Total Cache WordPress plugin supports Memcached as a caching method. MemCachier is protocol-compliant with Memcached (and has several advantages over Memcached) so W3 Total Cache can be configured to use MemCachier to speed up your WordPress site.
Configuring W3 Total Cache to use MemCachier involves two steps:
- Install the Memcached PHP extension.
- Update the appropriate W3 Total Cache settings from WordPress Admin.
Install the Memcached PHP extension
First, check to see if the Memcached PHP extension is installed.
From the WordPress Admin left-hand menu, click Performance, then Dashboard. Then, from the W3 Total Cache dashboard, click compatibility check.
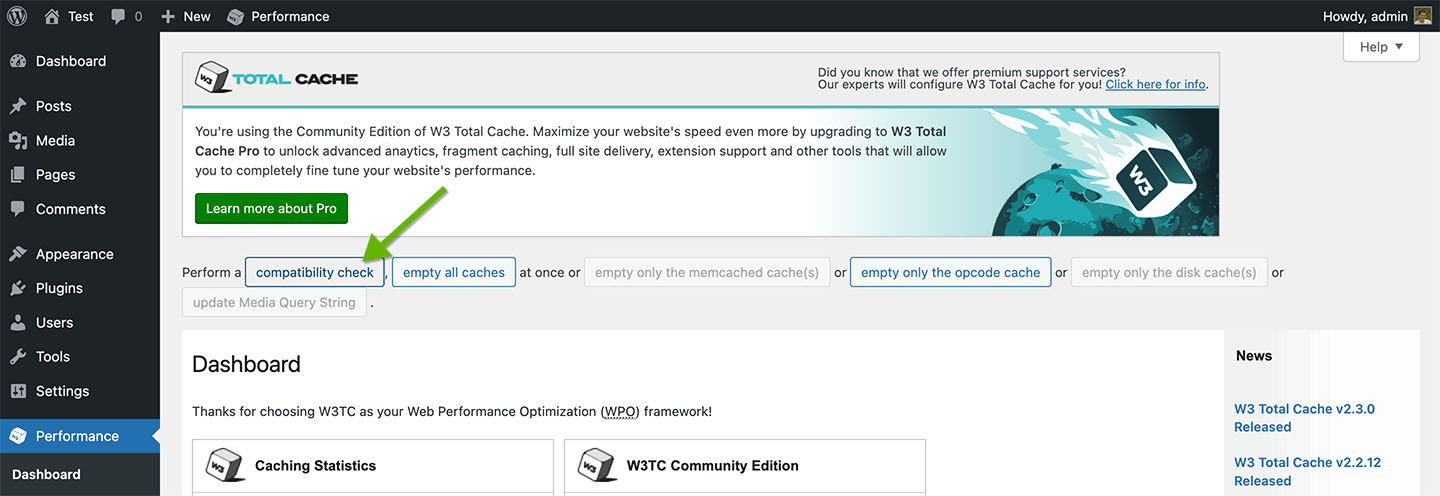
This will run a compatibility check for the various server modules and resources W3 Total Cache can make use of.
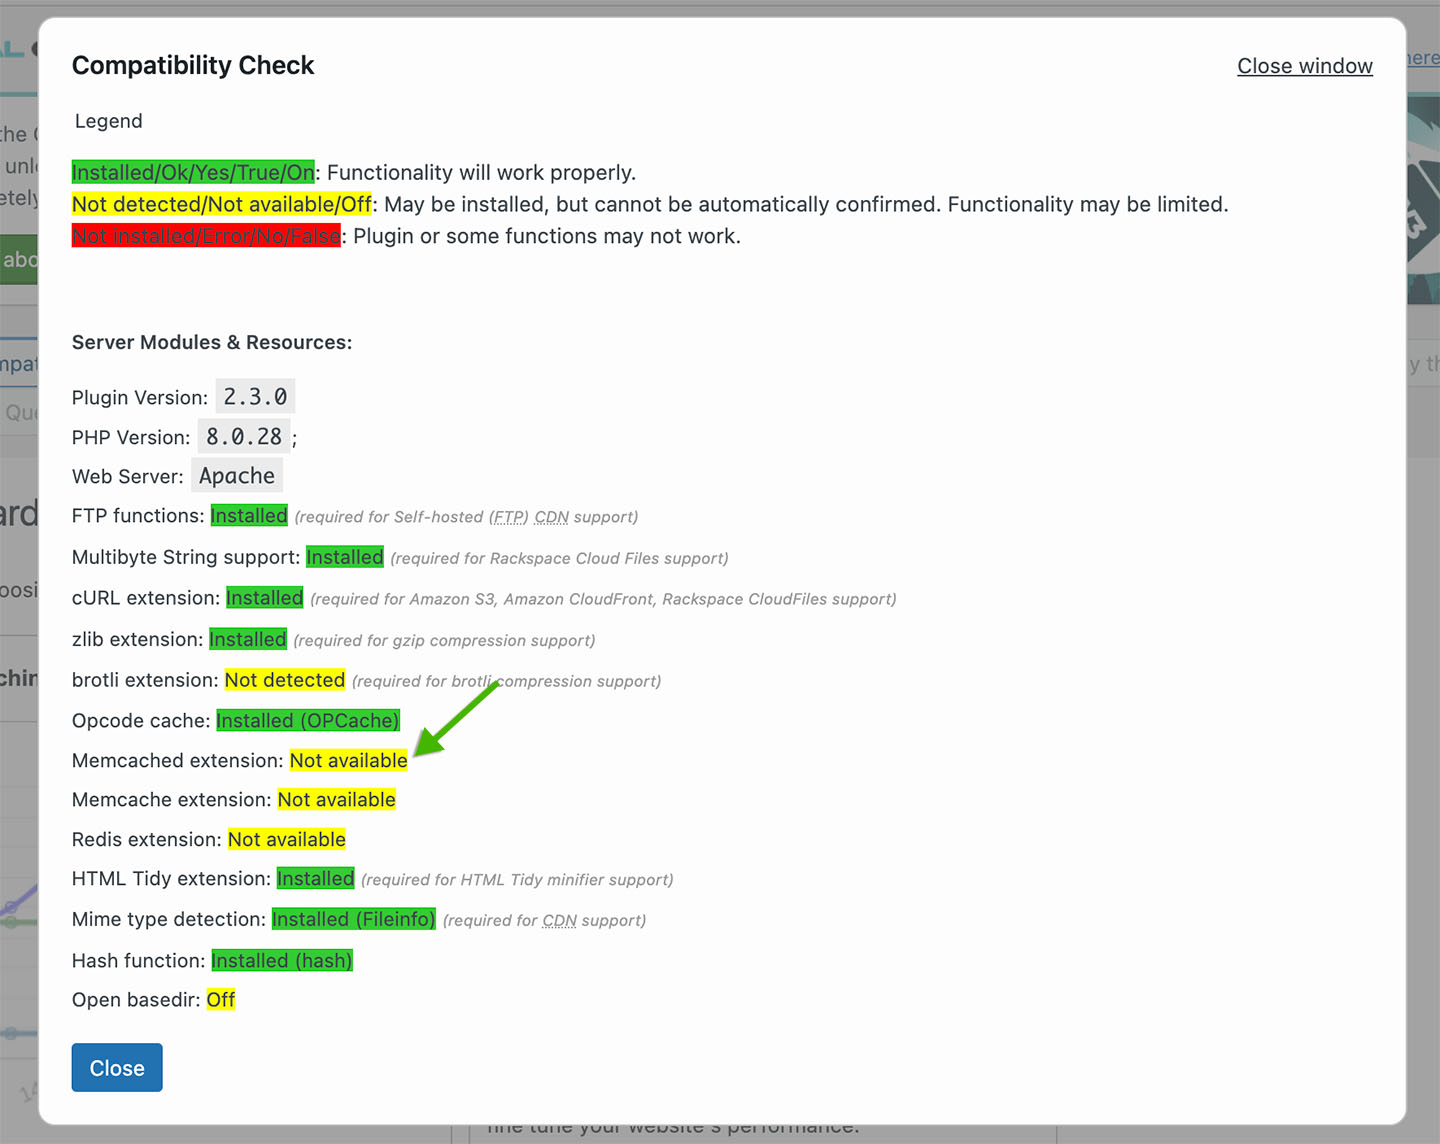
Notice, the Memcached PHP extension is shown as Not available, meaning it is not installed.
Next, install the Memcached PHP extension (not the Memcache extension). Make sure to install a version compatible with your installed version of PHP. Refer to the Compatibility Check results to see your PHP version. In the screenshot 8.0.28 is shown. If the PHP version you see is different, find a compatible extension version and install the appropriate extension version:
Note, the Memcached PHP extension is used because it supports SASL authentication, which is required to connect to your MemCachier cache using its username and password. The Memcache PHP extension, on the other hand, does not support SASL authentication.
Install the Memcached PHP extension with your OS package manager. For example, to install the extension on Ubuntu, run the following command:
sudo apt-get install -y php8.0-memcachedRestart your web server.
Once that is complete, refresh your WordPress Admin browser window and click Compatibility Check again. The Memcached extension should now show as Installed.
W3 Total Cache can now use Memcached as a caching method.
Update W3 Total Cache Settings to use Memcached
To view the W3 Total Cache settings, click Performance on the WordPress Admin left sidebar menu. When you do this for the first time, you’ll be redirected to the W3 Total Cache Setup Guide. For now, click Skip at the bottom of that page. You can rerun it anytime by clicking Setup Guide from the Performance sub-menu.
Next, update the appropriate W3 Total Cache settings from WordPress Admin to use your MemCachier cache as its Memcached caching method.
Memcached can be used as a caching method for the following W3 Total Cache features:
- Page Cache
- Minify
- Database Cache
- Object Cache
- Fragment Cache (available with W3 Total Cache Pro paid plugin)
Configuring each one involves the same two steps:
- Enable the feature, selecting Memcached as the caching method.
- Configure the feature to use your MemCachier cache.
In the following section, you’ll configure the Object Cache. As mentioned, other Memcached-supported features require a very similar configuration process, so these following instructions should enable you to configure any of the other features.
Configuring the W3 Total Cache Object Cache
To enable the Object Cache, from the WordPress Admin left-hand menu, click Performance, then General Settings. Then, scroll down to the Object Cache settings.
Check the Enable checkbox to enable the object cache. Then, select Memcached and save settings.
Provided you con’t have a local Memcached server running, you’ll see the following warning:
The following memcached servers are not responding or not running:
Object Cache: 127.0.0.1:11211.
This message will automatically disappear once the issue is resolved.
This is because W3 Total Cache is configured by default to look for a Memcached server running on host 127.0.0.1 and port 11211.
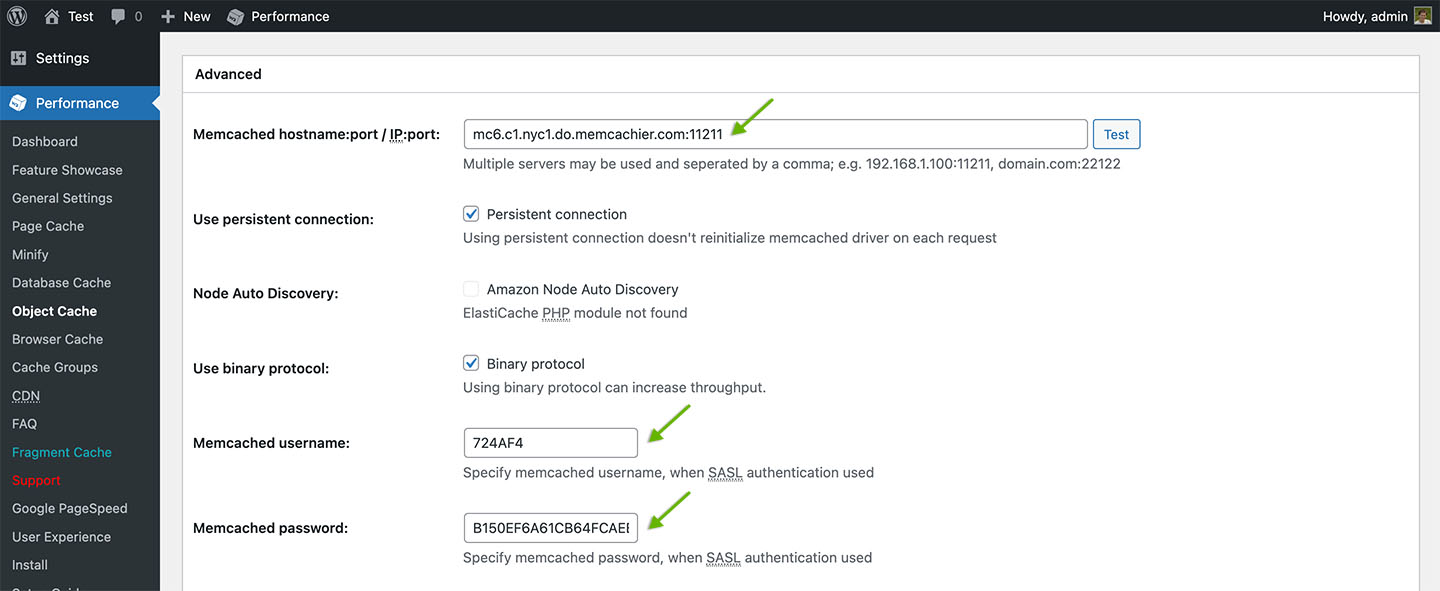
Next, to configure your cache, click Performance, then Object Cache.
Under Advanced, enter your MemCachier cache’s server(s) in Memcached hostname:port / IP:port.
Then, enter your MemCachier cache’s username and password in Memcached username and Memcached password respectively.
Make sure Binary protocol is checked.
Finally, save the settings.
The W3 Total Cache Object Cache is now configured to use MemCachier. You’ll see the following notices at the top of the page:
Plugin configuration successfully updated.
Object caching via memcached is currently enabled
Note that a memcached testing bug was fixed in W3 Total Cache version 2.3.2, released on May 9, 2023.
The bug was related to testing Memcached using SASL authentication and would incorrectly show correctly configured and working caches as not working. When using older versions of the plugin, you will see the following notice after saving settings:
The following memcached servers are not responding or not running:
Object Cache: your_server.memcachier.com:11211.
This message will automatically disappear once the issue is resolved.
Also, due to the same bug, if you clicked the Test button beside Memcached hostname:port / IP:port, you would get an error notification, Test Failed.
Update the W3 Total Cache plugin to the latest version, and those errors will disappear.
Check Memcached is working
To verify you cache is working, check your MemCachier Analytics dashboard.
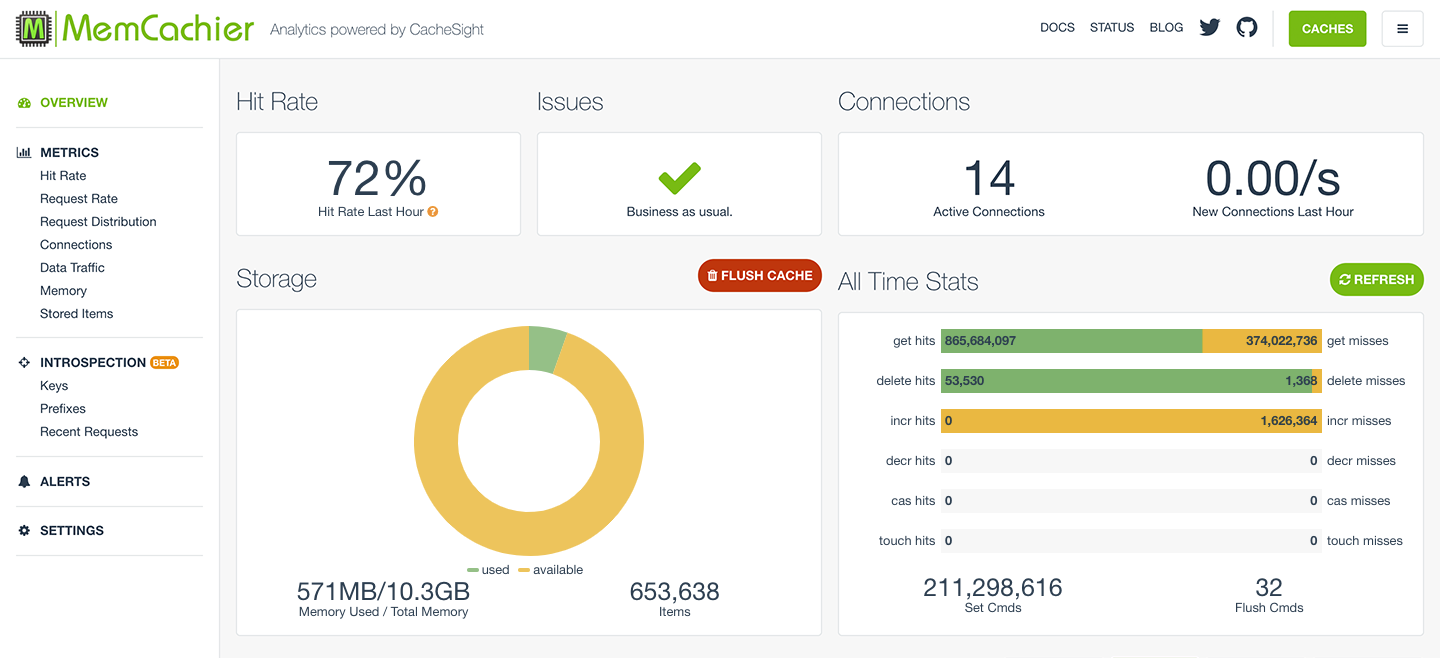
To access your cache’s analytics dashboard login to your account and view one of your caches.
Notice the stats change when you refresh your WordPress website. On the All Time Stats card, you’ll see misses increase initially as items are missed, then stored in your cache. Then, you’ll see hits increase as those items are served from the cache.
WP Object Cache
WP Object Cache tutorials:
Another way to use MemCachier with WordPress is with our WordPress Object Cache backend. It integrates the MemCachier caching service with WP Object Cache.
Note, the W3 Total Cache plugin features object caching, so there is no need to use this technique if you are using that plugin. In fact, it would likely be problematic to do so.
If you still want to use WP Object Cache instead of W3 Total Cache, see our tutorial Build a WordPress One-Click application on DigitalOcean and scale it with Memcache. The tutorial uses DigitalOcean as hosting but the WP Object Cache installation part is generally applicable.